Due to a few reasons, I didn’t shoot much in 2013. I’m planning to make 2013 much different. I have a new camera to explore, but more importantly I want to start challenging myself as a photographer.
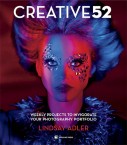
 To that end, I purchased a book on Amazon called, “Creative 52: Weekly Projects to Invigorate Your Photography Portfolio
” by Lindsay Adler. This book provides a new project each week. It is written by a fashion photographer, so I expect to start shooting more portratis than I have in the past. This alone is a departure from my regular subjects of landscapes and still life.
I’m going to try to shoot a new project each week, but sometimes life gets in the way. We’ll see how it goes.
WEEK ONE: CREATE AN IMAGE BASED ON A SINGLE COLOR
 It took me a couple of days to figure out what my subject would be. This is harder than it seems, really, but then it’s why I got the book. It’s also winter in Nebraska, so I didn’t really want to experiment outside. I decided on a green glass head that was in the house. One colour with a black background should do the job.
I decided to use the profile as any other angle made it look more like a glass ball. The next thing to consider was the lighting. I had a choice of natural light (window or overhead fluorescent), flash or studio light. I chose flash as I wanted to see what I could do with one flash in this project.
With subject and light source selected, I just needed to decide on lighting angle. As I had a glass subject, I thought that back lighting would be more effective way to see the colours in the subject.
 First shot: With the flash set on 1/4 manual, this is what I got. Way to bright, overexposed and just a mess. This isn’t at all what I was envisioning. I wanted a more subtle look with just the dark green of the glass being the main color. I tried a few different power settings on the flash and got the light levels to where I wanted them. The problem was that I was still getting a bright light that overexposed the middle and lower parts of the head.
I tried a few flash modifiers light a Rogue FlashBender but I couldn’t control the light path well enough. With that option gone, I delved into the DIY world and cut up some cardboard to block off the bottom of the head. Then I added another piece to help block light straying to black paper background. In the end, I used 4 different pieces of various sized cardboard to shape the light the way I wanted it.
 Here’s the setup I used. I had the flash on its back and used the Flashbender to direct light in the general direction I needed. You can see the different cardboard light blockers in place. I put the whole rig on a box to raise the light. Not the best looking solution, but it did the job. I also gave me a lot of versatility to try different positioning.
This was also a good exercise in seeing how adjusting these pieces could affect the image.
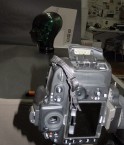
 To the left is a shot of the setup with the camera and background showing. I used a cheap black paper background, a box to elevate the head and a Nikon D800E with a Nikkor 105mm macro lens. This choice of lens allowed me to move in a crop away a lot of the background and parts of the head.
In the end, this turned out to be a fun shoot and I learned a few things about controlling the light.
 One the left is the image that I saw straight out of the camera. I was very close to the final image but needed some minor work in Photoshop.
I cropped the image from the top and bottom to get rid of some extra space up top. I fixed some blown highlights that were a little distracting, and then cloned out some spots that I felt detracted from the image. All in all, just a few minutes of editing time.
Here’s the final image I selected (1/250 – f6.3 – 100 ISO) :
Equipment used:
Background: Black paper (cheap bulk roll)
Background Support: Cardboard box
Light source: Nikon SB-800 flash
Light bounce: Rogue FlashBender
Light modifiers: Cardboard cut to size
Camera: Nikon D800E
Lens: Nikkor 105mm Macro
Ballhead: Giottoas MH-1300
Tripod: Slik Pro 700DX

I love that it looks almost like green hammered copper. You can SEE the texture, which was lost when the light was too strong and when it was too weak. I would not have imagined these results. And I think it came it far cooler than I anticipated it would. Great job.